(60) Almalinux9にZabbix6.0をインストール
このページは備忘録的なメモなので、これを見て作業して問題が起きても、当方では責任を持ちません。
Zabbix6.0の必要条件は下記のようになっています。
MariaDB 10.5.00-10.8.X later InnoDB engine is required.
Apache 1.3.12 or later
PHP 7.4.0 or later, 8.0, 8.1
PHP extensions:
gd 2.0.28 or later
bcmath php-bcmath (--enable-bcmath)
ctype php-ctype (--enable-ctype)
libXML 2.6.15 or later php-xml
xmlreader php-xmlreader, if provided as a separate package by the distributor. =php-xml
xmlwriter php-xmlwriter, if provided as a separate package by the distributor. =php-xml
session php-session, if provided as a separate package by the distributor. =php-common
sockets php-net-socket (--enable-sockets). Required for user script support.
mbstring php-mbstring (--enable-mbstring)
gettext php-gettext (--with-gettext). Required for translations to work. =php-common
openssl php-openssl. Required only if SAML authentication is used in the frontend. =php-common
mysqli Required if MySQL is used as Zabbix backend database. =php-mysqlnd
とりあえず、MoodleやWordPressなどをインストールするときと同様にAlmalinux9.0を標準インストールします。
Selinuxの無効化をします (無効化するとセキュリティーが低下するので、もしもやる場合は各自の責任で行ってください)
# vi /etc/selinux/config
SELINUX=enforcing
↓
SELINUX=disabled
変更前のオリジナルの設定ファイルを保存します。
# cd /etc/default
# cp grub grub.org
設定ファイルにオプションのselinux=0を追加します。
# vi grub
GRUB_CMDLINE_LINUX="resume=/dev/mapper/rhel-swap rd.lvm.lv=rhel/root rd.lvm.lv=rhel/swap rhgb quiet"
↓
GRUB_CMDLINE_LINUX="resume=/dev/mapper/rhel-swap rd.lvm.lv=rhel/root rd.lvm.lv=rhel/swap rhgb quiet selinux=0"
変更を反映させます。
# grub2-mkconfig -o /boot/grub2/grub.cfg
設定を反映するためにリブートします。
# reboot
システムが立ち上がったらログインします。
Selinuxの状態を調べます。
・Selinux有効状態
# sestatus
SELinux status: enabled
・Selinux無効状態
# sestatus
SELinux status: disabled <-- こちらになればOK
OSモジュールをアップデートします。
# dnf update
# reboot
データベースがインストールされているか一応チェックしてみます
# rpm -qa | grep mariadb
データベースのバージョンを確認します。
# dnf info mariadb
利用可能なパッケージ
名前 : mariadb
バージョン : 10.5.16 <-- 新しいバージョンなのでこれでOKです
リリース : 2.el9_0
Arch : x86_64
ソース : mariadb-10.5.16-2.el9_0.src.rpm
インストールします
# dnf install mariadb-server mariadb mariadb-common perl-DBD-MariaDB perl-Sys-Hostname
Apacheがインストールされているかチェックします。無ければインストールします。
# rpm -qa | grep httpd
# dnf install httpd httpd-devel httpd-tools mod_ssl
PHPのバージョンを調べます
# dnf info php
利用可能なパッケージ
名前 : php
バージョン : 8.0.13 <-- 新しいバージョンなのでこれでOKです
リリース : 2.el9_0
Arch : x86_64
ソース : php-8.0.13-2.el9_0.src.rpm
Zabbix用にphp8.0をインストールします
# dnf install php php-cli php-common php-devel php-gd php-intl php-json php-mbstring php-opcache php-pdo php-pear php-pecl-apcu php-pecl-zip php-process php-soap php-xml php-mysqlnd php-devel php-fpm php-gd php-gmp php-snmp php-pecl-apcu-devel net-snmp net-snmp-agent-libs php-bcmath
HTTPサーバーを起動します
# systemctl restart httpd.service
# systemctl enable httpd.service
# systemctl restart php-fpm.service
# systemctl enable php-fpm.service
Fiewallの設定をします
デフォルトではポート22/TCP(ssh)しか開いていないのでhttp,https,smtpなど必要なポートを追加します
Zabbix用にはポート10050/TCPを開きます。
# firewall-cmd --list-all-zones (開いているポートをチェック)
# firewall-cmd --add-service=http --zone=public --permanent
# firewall-cmd --add-service=https --zone=public --permanent
# firewall-cmd --add-service=smtp --zone=public --permanent
# firewall-cmd --add-port=10050/tcp --zone=public --permanent <--Zabbix用のポート
# firewall-cmd --reload
# firewall-cmd --list-all-zones (開いているポートを再チェック)
httpd(Apache)の設定をします
Webサイトデータを載せるディレクトリを /data/html にしました。
# mkdir /data (データを載せるディレクトリを作ります)
# mkdir /data/html (ドキュメントルートに設定するディレクトリを作ります)
# cd /etc/httpd/conf (httpdの設定ファイルがあるディレクトリに移動します)
# ls
# cp httpd.conf httpd.conf.org (一応、オリジナルの設定ファイルを名前を付けてコピー保存しておきます)
# vi httpd.conf (設定ファイルを修正します)
DocumentRoot “/var/www/html”
↓
DocumentRoot “/data/html” <--こちらに修正
<Directory “/var/www/html”>
↓
<Directory “/data/html”> <--こちらに修正
DirectoryIndex index.html
↓
DirectoryIndex index.php index.html <--こちらに修正
<Directory />
AllowOverride none
Require all denied <--なぜかデフォルトでは全てのアクセスを拒否する設定になっています
</Directory>
↓
<Directory />
AllowOverride none
Require all granted <--全てのアクセスを許可する設定に修正します
</Directory>
mimetypeの設定追加をします
# vi /etc/mime.types
application/x-httpd-php php (追加します)
application/x-httpd-php-source phps (追加します)
phpの設定をします
phpのログを記録するディレクトリを作ります
# mkdir /var/log/php
# chown apache:apache /var/log/php (apacheから書き込めるようにします)
# chmod 755 /var/log/php
オリジナルのphp設定ファイルを残しておきます
# cp /etc/php.ini /etc/php.ini.org
phpの設定ファイルを修正します
# vi /etc/php.ini
;date.timezone =
↓
date.timezone = 'Asia/Tokyo'
error_reporting = E_ALL & ~E_DEPRECATED & ~E_STRICT
↓
error_reporting = E_ALL & ~E_NOTICE
;error_log = php_errors.log
↓
error_log = "/var/log/php/php_errors.log" (さきほど作ったディレクトリにログを残すようにします)
memory_limit = 128M
↓
memory_limit = 256M
post_max_size = 8M
↓
post_max_size = 100M
upload_max_filesize = 2M
↓
upload_max_filesize = 100M
;mbstring.language = Japanese
↓
mbstring.language = Japanese
;mbstring.internal_encoding =
↓
mbstring.internal_encoding = UTF-8
;mbstring.http_input =
↓
mbstring.http_input = pass
;mbstring.http_output =
↓
mbstring.http_output = pass
;mbstring.encoding_translation = Off
↓
mbstring.encoding_translation = Off
;mbstring.detect_order = auto (そのまま)
;mbstring.substitute_character = none
↓
mbstring.substitute_character = none;
;mbstring.strict_detection = Off
↓
mbstring.strict_detection = Off
max_execution_time = 30
↓
max_execution_time = 300
max_input_time = 60
↓
max_input_time = 300
;max_input_vars = 1000
↓
max_input_vars = 5000
# cd /data/html (httpdのドキュメントルートに移動します)
# vi test.php (phpが本当に動くかチェック用のファイルを作ります)
下記の3行を記入します。
<?php
phpinfo();
?>
phpの設定変更を反映させるためにhttpdをリスタートします
# systemctl restart httpd
# systemctl restart php-fpm
ブラウザでこのサーバーにアクセスしてPHPテスト画面が出ればOKです。
http://( FQDN )/test.php
MariaDBの追加設定をします
# vi /etc/my.cnf.d/mariadb-server.cnf
# this is read by the standalone daemon and embedded servers
[server]
character-set-server=utf8 <--追加
max_allowed_packet=10MB <--追加
connect_timeout=360 <--追加
net_read_timeout=360 <--追加
# vi /etc/my.cnf.d/mysql-clients.cnf
[mysql]
default-character-set = utf8 <--追加
MariaDBを起動します
# systemctl start mariadb
MariaDBが自動起動するように設定します
# systemctl enable mariadb
# mysql_secure_installation (mariadbの初期設定をします)
Enter current password for root (enter for none): (まだパスワードは設定してないからそのままEnter)
Switch to unix_socket authentication [Y/n] n
Set root password? [Y/n] Y
New password: (mariadb用に設定したいパスワード)
Re-enter new password:(再度mariadb用のパスワード)
Remove anonymous users? [Y/n] Y
Disallow root login remotely? [Y/n] Y
Remove test database and access to it? [Y/n] Y
Reload privilege tables now? [Y/n] Y
Thanks for using MariaDB!
# mysql -u root -p(先ほど設定したmariadb用のパスワード) (rootで入ります)
> select host,user,password from mysql.user;(ユーザーとパスワードの状況をチェックします)
> create database zabbix character set utf8mb4 COLLATE utf8mb4_bin;(Zabbix用のデータベースを作ります)
> grant all on zabbix.* to zabbix@localhost identified by 'zabbixユーザー用のパスワード'; (データベース用のユーザーを作ります)
> show databases; (データベースができているか確認します)
> exit
Zabbixのインストール
# cd /usr/local/src
必要なソフトをインストールします
Zabbix のリポジトリを登録します。
# rpm -Uvh https://repo.zabbix.com/zabbix/6.0/rhel/9/x86_64/zabbix-release-6.0-3.el9.noarch.rpm
# dnf clean all
Zabbixのserver, frontend, agentその他必要なソフトをインストールします。
# dnf install zabbix-server-mysql zabbix-web-mysql zabbix-apache-conf zabbix-sql-scripts zabbix-selinux-policy zabbix-agent
作っておいたZabbix用のデータベースに中身を入れます。
# cd /usr/share/zabbix-sql-scripts/mysql
# gunzip server.sql.gz
# ls
# mysql -u root -p(mariadbのパスワード) zabbix < server.sql
Zabbixサーバーの設定をします。
# vi /etc/zabbix/zabbix_server.conf
# DBHost=localhost
↓
DBHost=localhost
# DBPassword=
↓
DBPassword=(データベースのZabbixユーザーのパスワードを入力)
Zabbixサーバーとエージェントを起動します。
# systemctl restart zabbix-server zabbix-agent httpd php-fpm
# systemctl enable zabbix-server zabbix-agent httpd php-fpm
Zabbixエージェントのバージョンを確認します。
# zabbix_get -s 127.0.0.1 -k agent.version
bash: zabbix_get: command not found... (zabbix_getコマンドが無いのでインストールするか聞かれます)
Install package 'zabbix-get' to provide command 'zabbix_get'? [N/y] y (インストールします)
Proceed with changes? [N/y] y
# zabbix_get -s 127.0.0.1 -k agent.version (もう一度バージョン確認のコマンドを入力すると表示されます)
6.0.8 ←バージョンが表示されればOKです
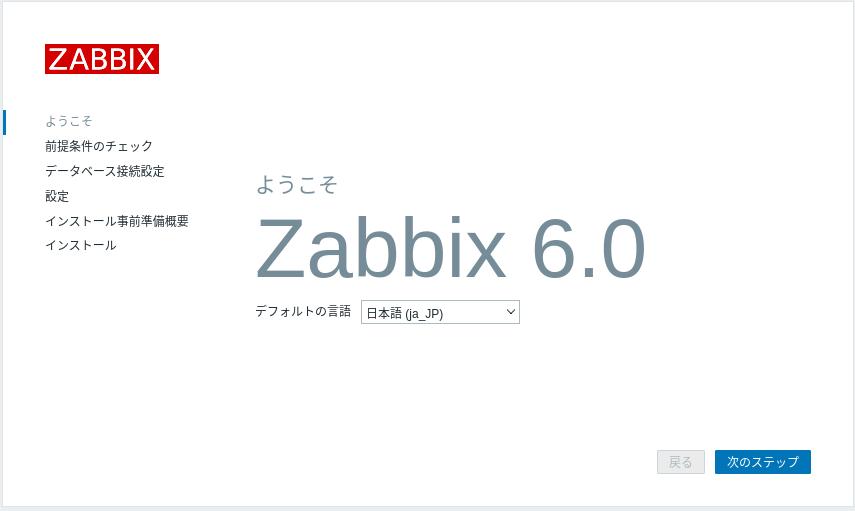
ブラウザで http://[FQDN]/zabbix を開いてzabbixの初期設定を行います。
画面が表示されるので順番に設定をします。
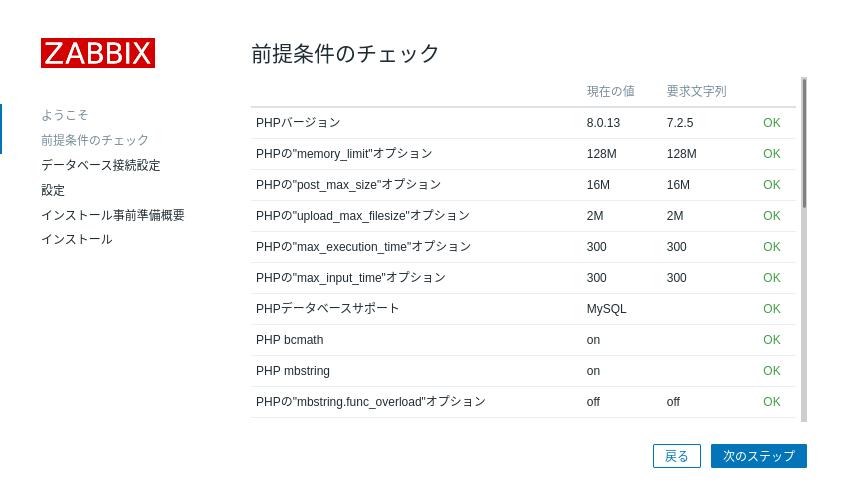
前提条件のチェック画面が表示されます。すべてOKとなっているはずです。
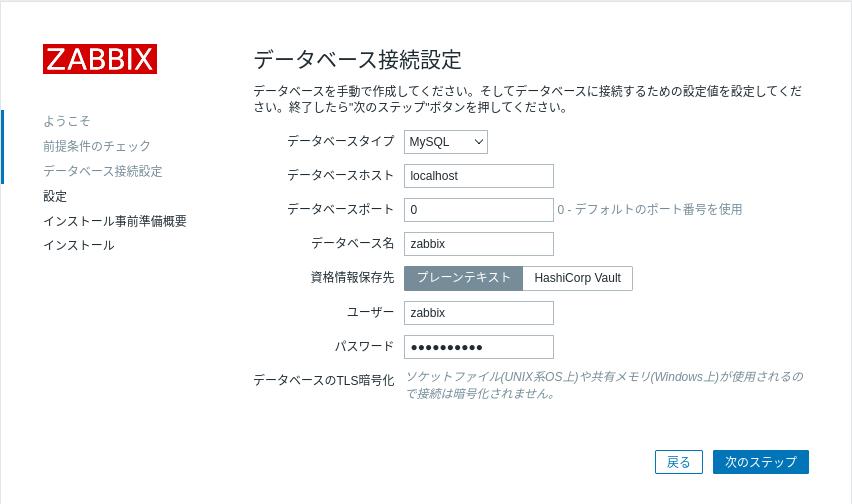
データベースへの接続情報を入力します。
データベースホスト: localhost
データベース名:zabbix
ユーザー: zabbix
パスワード:mariadbの設定時に入力したzabbixユーザーのパスワード
任意のZabbixサーバー名を設定します。
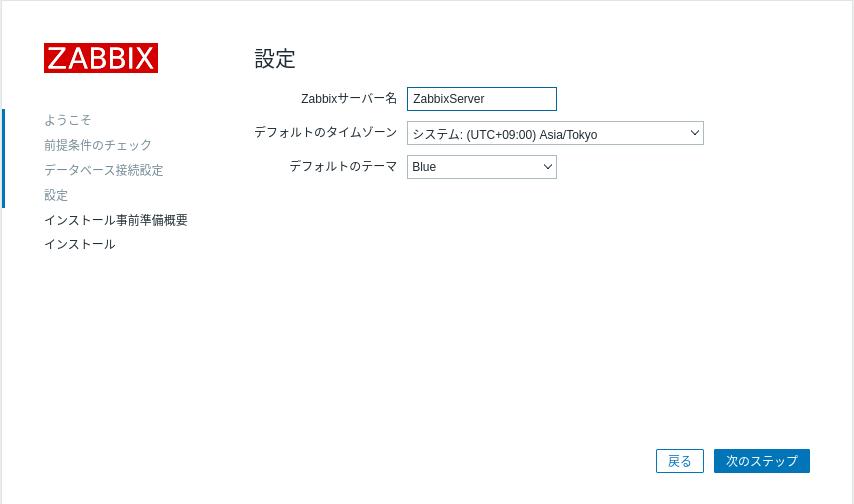
設定確認画面が表示されます。

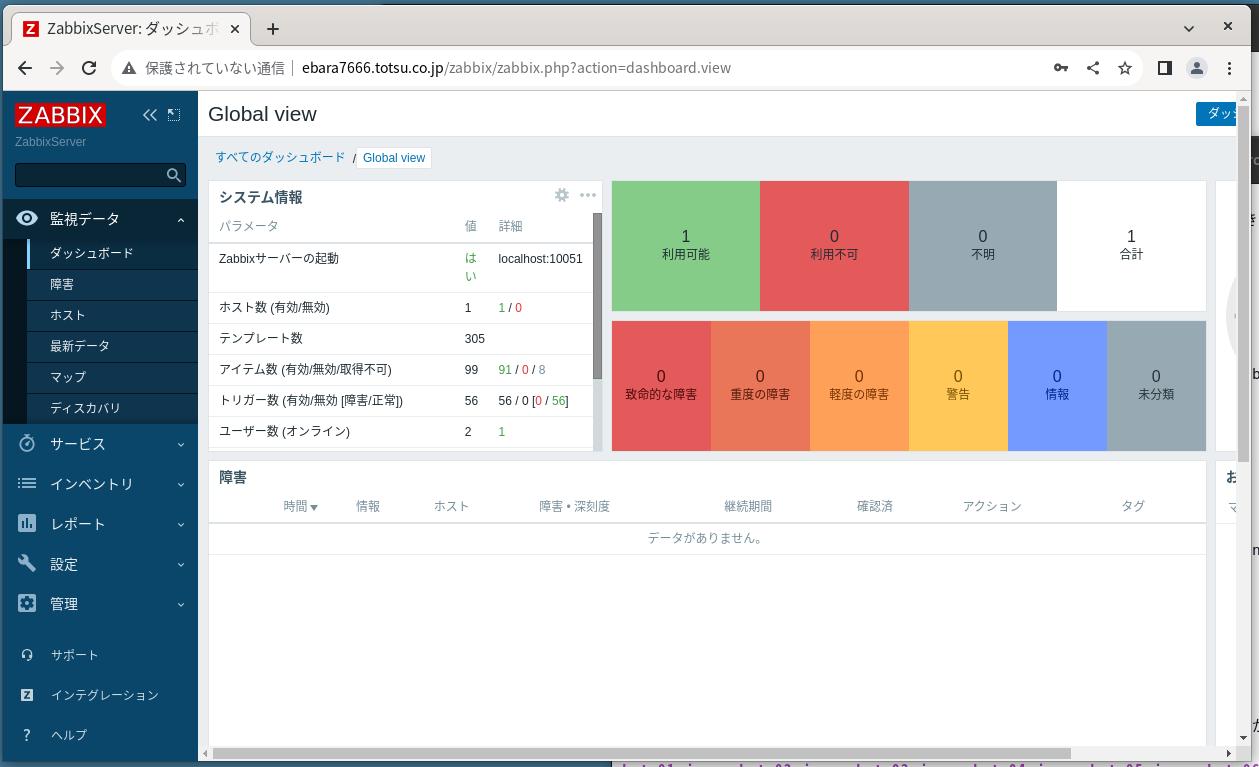
無事に設定が完了するとZabbinのログイン画面が表示されます。
デフォルトユーザー名:Admin
デフォルトパスワード: zabbix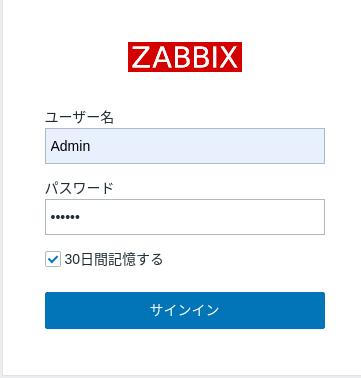
ログインするとシステムの設定画面が表示されます。設定方法はZabbixの資料や参考書を参照してください。